How To Make A Headboard Stand On Its Own, you can attach legs to the bottom of the headboard using screws or brackets. By securely attaching legs, the headboard will be able to stand upright without support.
A headboard can add personality and style to a bedroom, but it’s essential for it to stand on its own for stability and functionality. Attaching legs to a headboard is a simple and effective solution to ensure it stands upright without wobbling or falling over.
Whether you have a store-bought headboard or a diy project, adding legs can provide the necessary support. In this article, we will explore the steps to make a headboard stand on its own, allowing you to enjoy a well-structured and visually appealing bed setup.
Why A Stable Headboard Matters
The Significance Of A Headboard Standing On Its Own
When it comes to designing the perfect bedroom, a headboard can play a crucial role in elevating both style and functionality. While headboards add a touch of elegance to the overall aesthetic, their stability is equally important in ensuring a comfortable and secure sleep environment.
In this section, we will delve into the reasons why a headboard that stands on its own is a must-have feature for any bedroom.
Benefits of a stable headboard:
- Enhanced support: A stable headboard provides essential support to your mattress, preventing it from shifting or sliding out of place during the night. This stability ensures that you can enjoy a restful sleep without constantly having to readjust your mattress.
- Durability: A headboard that stands on its own is typically constructed with sturdy materials, guaranteeing its longevity and durability. This means that your investment in a stable headboard will last for years to come, eliminating the need for frequent replacements.
- Improved comfort: When a headboard is securely attached to the bed frame, it acts as a buffer between the wall and your pillow, preventing any discomfort caused by direct contact with a cold or rough surface. This added layer of cushioning creates a more comfortable and cozy sleeping environment.
- Noise reduction: A stable headboard also serves as a noise barrier, absorbing any sounds that may be created when moving or shifting during sleep. This helps to minimize disturbances for both you and your partner, ensuring a peaceful night’s rest.
The impact on overall bedroom aesthetics:
- Visual focal point: A headboard that stands on its own can instantly transform the look of a bedroom by acting as a striking focal point. Whether it’s a sleek, contemporary design or a plush, upholstered headboard, it adds a touch of sophistication and style to the space.
- Personalization: With a stable headboard, you have the opportunity to showcase your personal taste and style through various design options. From luxurious fabrics and intricate patterns to bold colors and modern shapes, the possibilities are endless in creating a headboard that reflects your unique personality.
- Coordinated design: A headboard that stands on its own allows for seamless coordination with the rest of your bedroom furniture. By selecting a headboard that complements your nightstands, dressers, and other elements in the room, you can create a cohesive and visually appealing overall design.
A stable headboard not only provides practical benefits such as support and comfort but also significantly contributes to the overall aesthetics of your bedroom. Its stability ensures a more peaceful and enjoyable sleep experience, while also allowing you to express your personal style and create a visually pleasing space.
How To Make A Headboard Stand On Its Own
Creating a freestanding headboard can be an innovative solution for rooms where you can’t or don’t want to attach a headboard directly to the wall or bed frame. Here’s a detailed guide to help you design and construct a headboard that stands on its own.
Materials:
- Plywood or MDF board (for the headboard itself)
- 2x4s or similar lumber (for the support legs and frame)
- Screws
- Drill and drill bits
- Sandpaper
- Paint or fabric (for finishing)
- Upholstery foam (optional, for padded headboards)
- Staple gun (optional, for fabric-covered headboards)
Instructions:
1. Determine Size and Design
- Measure the width of your bed to determine the width of the headboard. Consider adding a few extra inches on each side for aesthetic purposes.
- Decide on the height you desire for your headboard. A typical height might range from 48 to 60 inches, but it’s up to your preference.
2. Cut the Plywood or MDF Board
Using a saw, cut the plywood or MDF to the desired size based on your measurements.
3. Design the Support Structure
- The basic idea is to create two “legs” that extend perpendicularly from the headboard to support it. They need to be sturdy and wide enough to maintain stability.
- Determine the length of the legs. Consider making them about 2/3 the height of the headboard.
- Cut two 2x4s to this length.
4. Assemble the Headboard and Legs
- Attach the 2×4 legs to the back of the plywood or MDF board using screws. Ensure that they are vertically aligned and evenly spaced from each side of the headboard.
- For added stability, consider adding horizontal braces between the two legs near the bottom and halfway up.
5. Finish the Headboard
Sand the entire structure to smooth out any rough edges.
If you want a padded headboard:
- Cut upholstery foam to the size of your plywood or MDF board.
- Attach the foam to the board using adhesive.
- Stretch your desired fabric over the foam and secure it to the back of the headboard with a staple gun.
- If you prefer a painted or stained look:
- Apply a primer (if needed) and let it dry.
- Paint or stain the headboard in your desired color or shade.
- Let the paint or stain dry completely.
6. Add Stability Features (if desired):
- If you’re concerned about the headboard tipping, you can add weight to the bottom of the legs or utilize rubberized pads to prevent sliding.
- Another option is to use angle braces to connect the headboard to the wall discreetly. This won’t make it completely freestanding, but it’ll provide extra support.
7. Positioning:
- Move your bed slightly away from the wall.
- Place the freestanding headboard behind the bed, ensuring it’s centered.
- Push the bed back against the headboard for additional stability.
- You’ve just created a headboard that stands on its own. Adjustments can be made based on the specific design you want or the materials you have available.
So, when it comes to choosing a headboard, make sure it stands on its own to maximize both functionality and design appeal.
Key Considerations Before Building
A sturdy and well-built headboard can instantly transform the look and feel of your bedroom. If you’ve been considering building your own headboard to add a unique touch to your space, there are a few key considerations to keep in mind before you get started.
By assessing the existing headboard, determining the best materials for stability, and choosing the right tools for the project, you can ensure that your headboard stands on its own, quite literally. Let’s dive into these key considerations below.
Assessing The Existing Headboard:
- Take a close look at your current headboard to evaluate its condition and stability.
- Check for any damage or weaknesses that may require repair or reinforcement.
- Assess the size and dimensions of the existing headboard to determine if modifications are necessary.
Determining The Best Materials For Stability:
- Look for durable and sturdy materials that can withstand the weight and pressure of a free-standing headboard.
- Consider using solid wood or plywood to provide a strong foundation.
- Opt for high-quality screws and fasteners to ensure a secure assembly.
Choosing The Right Tools For The Project:
- Gather a variety of basic tools such as a power drill, measuring tape, and level.
- Use clamps to hold pieces in place during assembly and ensure accurate alignment.
- If you plan on adding upholstery or fabric to your headboard, have a staple gun and fabric adhesive ready.
By carefully assessing the existing headboard, determining the best materials for stability, and choosing the right tools for the project, you’ll be well-prepared to make a headboard that stands on its own while adding a touch of style to your bedroom.
Remember to take your time, follow safety guidelines, and enjoy the process of creating a unique and functional piece for your space.
Preparing Your Workspace
Clearing the work area:
- Remove any unnecessary items or clutter from the space where you plan to work on your headboard.
- This will give you ample room to move around and work efficiently.
- Ensure that there is enough space to lay out all the tools and materials you will need.
Gathering necessary tools and materials:
- Create a checklist of all the tools and materials required to make your headboard stand on its own.
- This may include screws, a drill, a screwdriver, brackets, wood glue, sandpaper, and a level.
- Having everything prepared beforehand will save you time and ensure a smooth workflow.
Setting up a safe and organized space:
- Before you start working, make sure the area is safe and well-lit.
- This will prevent any accidents or mishaps during the construction process.
- Organize your tools and materials by placing them in easy-to-reach locations.
- Set up a sturdy work table or surface to work on, ensuring it is level and stable.
By clearing the work area, gathering necessary tools and materials, and setting up a safe and organized space, you will be ready to begin making your headboard stand on its own. Taking these initial steps will ensure a smooth and efficient workflow, allowing you to focus on the task at hand without any distractions.
Measuring And Marking
When it comes to making a headboard stand on its own, proper measurements and markings are crucial. By accurately measuring the height and width of the headboard, marking the spots for attachment, and ensuring proper alignment, you can create a stable and sturdy piece of furniture.
Let’s take a closer look at each step:
Measuring The Height And Width Of The Headboard:
- Measure the height of the headboard from top to bottom, ensuring you have enough clearance from the floor.
- Use a tape measure or ruler to measure the width of the headboard, taking into account any decorative elements or protrusions.
Marking The Spots For Attachment:
- Using a pencil or marker, mark the areas on the headboard where you will attach it to the bed frame or wall.
- Make sure to evenly space the attachment spots along the width of the headboard for stability.
Ensuring Proper Alignment:
- To ensure the headboard stands straight and level, use a spirit level to check for any slopes or tilts.
- Adjust the position of the attachment spots if necessary, making sure they line up with the corresponding spots on the bed frame or wall.
By following these steps and taking accurate measurements, you can successfully make a headboard stand on its own. Remember to double-check your markings and alignment before finalizing the attachment process. With a sturdy and securely attached headboard, you can enhance the aesthetics and functionality of your bedroom.
Choosing The Right Support Method
Selecting the appropriate support system for your headboard:
When it comes to making a headboard stand on its own, choosing the right support method is crucial. You want a solution that not only ensures stability but also complements the design and aesthetics of your headboard.
Here are some options to consider:
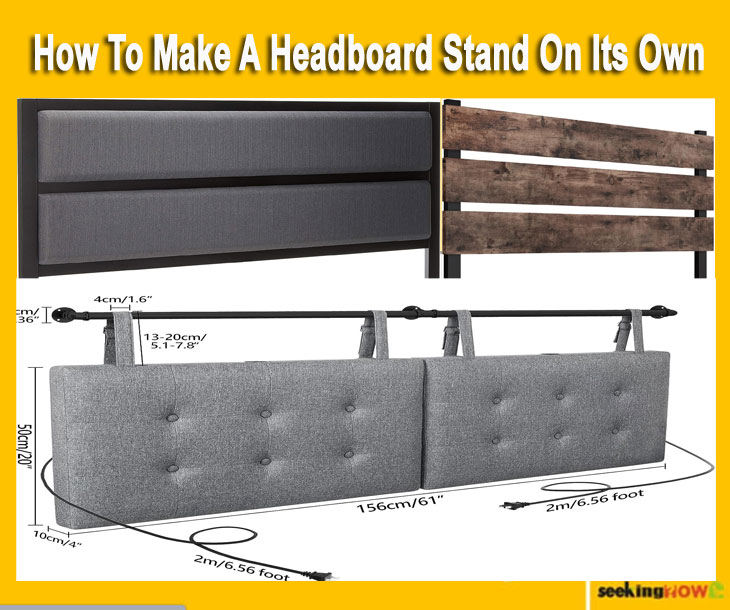
- Legs: One popular support method is using legs that attach directly to the headboard. This provides a sturdy base and allows the headboard to stand on its own. However, it’s important to ensure that the legs are strong enough to support the weight of the headboard and any additional attachments, such as shelves or lighting fixtures.
- Brackets: Another option is to use brackets that attach the headboard to the bed frame. This method provides added stability by connecting the headboard directly to the bed structure. It also eliminates the risk of the headboard tipping over. However, it may limit the flexibility to move or adjust the headboard.
- Wall mounting: If you want a more permanent solution, wall mounting is a great choice. By attaching the headboard directly to the wall, you can create a seamless and secure installation. This method is especially useful for heavier or oversized headboards. However, it may require additional tools and expertise to ensure proper installation.
Evaluating the pros and cons of each method will help you determine the best support system for your headboard. Consider factors such as the weight and size of your headboard, your desired level of stability, and the flexibility you need in terms of moving or adjusting the headboard.
Ultimately, the right support system will not only keep your headboard safe and secure but also enhance the overall look and feel of your bedroom.
Creating A Standalone Headboard
When it comes to giving your bed a stylish and functional upgrade, a standalone headboard can make a big impact. Not only does it add a touch of elegance to your bedroom, but it also provides extra support and stability.
Building a standalone headboard may seem like a daunting task, but with the right tools and techniques, you can easily create a custom headboard that stands on its own. We will guide you through the step-by-step process of building a standalone headboard, complete with detailed diagrams and illustrations for clarity.
Step-By-Step Instructions For Building A Standalone Headboard:
- Measure and plan: Start by measuring the width of your bed frame to determine the dimensions for your headboard. Consider the height you desire for the headboard as well. Sketch out a design that fits your style and space, keeping in mind any intricate details you may want to include.
- Gather materials: Once you have your measurements and design in place, gather all the necessary materials. This may include plywood for the base, foam or batting for padding, fabric or upholstery material, a staple gun, screws, and a drill.
- Build the base: Using the measurements from your design plan, cut the plywood to the appropriate size for the headboard base. Sand the edges to ensure a smooth finish. If desired, you can also add legs or supports to provide additional stability.
- Add padding: To make your headboard more comfortable, add a layer of foam or batting to the plywood base. Cut the foam to match the size of the headboard and attach it securely using adhesive or a staple gun.
- Upholster the headboard: Choose a fabric or upholstery material that complements your bedroom decor. Lay the fabric flat and place the headboard face down on top of it. Pull the fabric tightly around the edges and secure it to the back of the headboard with a staple gun, working from the center outwards.
- Finishing touches: Trim any excess fabric and neatly fold and staple the corners for a clean look. If desired, you can add decorative buttons or tufting to give your headboard a more luxurious feel.
- Attach the legs: If you opted for legs or supports, attach them securely to the bottom of the headboard using screws or brackets. Make sure they are level and provide adequate stability.
- Test it out: Before moving the headboard into your bedroom, check that it stands on its own and aligns properly with your bed frame. Make any necessary adjustments or reinforcements to ensure a secure fit.
By following these step-by-step instructions, you can create a beautiful and sturdy standalone headboard that adds both style and functionality to your bedroom. With the right tools and a little creativity, you’ll have a custom headboard that stands out from the rest.
So get ready to elevate your sleeping space with this DIY project that is sure to impress.
Building The Frame
Building the frame:
When it comes to making a headboard stand on its own, the frame plays a crucial role in providing stability and support. Building a sturdy frame will ensure that your headboard stays in place and doesn’t wobble or lean. In this section, we will guide you through the process of preparing the frame materials, assembling the frame components, and strengthening the frame for added stability.
Preparing The Frame Materials:
Before you begin constructing the frame, it’s essential to gather all the necessary materials.
Here are the key points to keep in mind:
- Measure and cut the wood: Start by measuring the dimensions of your headboard, and then cut the pieces of wood accordingly. Remember to leave enough space for any additional design elements you may want to incorporate.
- Sand the edges: Smooth out the edges of the cut wood pieces using sandpaper. This will prevent any splinters or rough surfaces that could potentially cause injuries.
Assembling The Frame Components:
With the materials prepared, it’s time to assemble the frame.
Follow these steps to ensure a secure and sturdy structure:
- Lay out the pieces: Arrange the wood pieces on a flat surface according to your headboard’s dimensions. This will help you visualize how the frame will come together.
- Attach the frame pieces: Using screws or nails, secure the wood pieces together at the corners. Make sure to align them properly to maintain a square shape. You may also reinforce the joints with wood glue for added strength.
Strengthening The Frame For Stability:
To ensure your headboard stands on its own without any wobbling or tilting.
consider these key points for strengthening the frame:
- Add support beams: Depending on the size and weight of your headboard, adding support beams across the width or height of the frame can enhance stability. These beams can be attached with screws or bolts.
- Reinforce with brackets: Use metal brackets to reinforce the corners of the frame. This will distribute the weight evenly and prevent any weak spots.
- Consider diagonal supports: For larger headboards, adding diagonal supports between the frame and the wall can provide additional stability. This can be achieved by attaching sturdy metal brackets diagonally across the frame.
By following these steps and implementing the necessary measures, you can build a strong and stable frame for your headboard. This will ensure that it stands on its own and becomes a standout feature in your bedroom.
Attaching The Panels
When it comes to making a headboard stand on its own, one crucial step is properly attaching the panels. Whether you choose wood, fabric, or any other material for your panels, it’s important to secure them to the frame securely.
Here are the key points to keep in mind:
- Choosing the panel materials: Select the type of material that suits your style and preferences. Wood panels can provide a classic and sturdy look, while fabric panels can offer a softer and more plush appearance.
- Cutting and shaping the panels: Measure and cut the panels to fit the dimensions of your headboard frame. Make sure to refine their shape if needed and sand any rough edges for a polished finish.
- Properly securing the panels to the frame: To ensure the panels stay in place, use the appropriate fastening method for your chosen materials. For wood panels, you can use screws or nails. For fabric panels, consider using a staple gun to securely attach the fabric to the frame.
Remember, the stability and durability of your headboard heavily rely on how well the panels are attached. Taking the time to choose the right materials, cutting and shaping the panels accurately, and properly securing them to the frame will ensure your headboard stands on its own with pride.
Finishing Touches
If you’re looking for the perfect finishing touches to make your headboard stand on its own and truly make a statement in your bedroom, we’ve got you covered. In this section, we’ll explore the essential steps to complete your headboard project with finesse.
From sanding and smoothing the surfaces to applying a protective finish, and even adding decorative elements, we’ll walk you through each detail.
Sanding And Smoothing The Headboard Surfaces:
- Start by using medium-grit sandpaper to smooth out any rough edges or surfaces on the headboard.
- Work your way up to fine-grit sandpaper to achieve a smooth and even finish.
- Pay extra attention to corners and intricate details to ensure all areas are properly sanded.
- Remove any dust or debris using a soft cloth or vacuum cleaner before moving on to the next step.
Applying A Protective Finish:
- Choose a finishing material that aligns with your desired aesthetic and level of protection. Options include varnish, paint, stain, or natural oils.
- Apply the finish using a brush, roller, or cloth, following the product instructions for best results.
- Allow each coat to dry fully before applying subsequent coats.
- Consider applying multiple coats to enhance durability and achieve the desired look.
- Lightly sand between coats to remove any imperfections or excess finish.
Adding Embellishments Or Decorative Elements:
- Explore your creativity by incorporating embellishments or decorative elements onto your headboard.
- Consider adding upholstery or fabric for a soft and luxurious appearance.
- Experiment with stencils or decals to create unique patterns or designs.
- Install nailhead trim or decorative buttons to add an elegant touch.
- Don’t forget to step back occasionally to assess the overall balance and visual impact of your embellishments.
By following these steps, you’ll be able to transform your headboard into a one-of-a-kind piece that stands on its own, both in terms of style and functionality. Whether you prefer a rustic look or a more refined aesthetic, these finishing touches will ensure your headboard becomes the focal point of your bedroom.
Now it’s time to let your creativity shine and bring your headboard vision to life.
Installing The Standalone Headboard
Ensuring The Right Positioning In The Bedroom
Installing a standalone headboard can be a great way to add style and personality to your bedroom. However, before you get started, it’s important to ensure that you have the right positioning for your headboard. Here are some key points to consider:
- Take measurements: Measure the width and height of your bed or mattress to determine the appropriate size for your headboard. This will help you achieve a balanced and proportional look in your bedroom.
- Consider the room layout: Take into account the overall layout of your bedroom when positioning your headboard. Think about the placement of other furniture, windows, and doors to ensure that your headboard doesn’t obstruct any important elements in the room.
- Centering the headboard: Position the headboard at the center of the wall or bed frame to create a visually pleasing and symmetrical arrangement. This will serve as the focal point of your bedroom, instantly elevating the aesthetic appeal.
Securing The Headboard To The Wall Or Bed Frame
Once you have determined the perfect position for your standalone headboard, it’s time to secure it in place.
Here are a few important steps to follow:
- Wall-mounted installation: If you prefer a clean and seamless look, consider mounting the headboard directly onto the wall. Use a stud finder to locate the wall studs, then attach mounting brackets securely to the headboard and wall. Make sure to use the appropriate hardware for your wall type to ensure stability.
- Bed frame attachment: If you want a more flexible option, you can secure the headboard directly to your bed frame. Most bed frames come with pre-drilled holes for headboard attachment. Simply align the headboard with the holes and use bolts or screws to fasten it securely.
Testing The Stability And Making Any Necessary Adjustments
With the headboard now attached to either the wall or bed frame, it’s important to ensure that it is stable and secure.
Follow these steps to test the stability and make any necessary adjustments:
- Give it a firm shake: Apply pressure to the headboard in different areas to test its stability. If you notice excessive movement or wobbling, it may indicate that further adjustments are needed.
- Tighten screws or bolts: Check all the screws and bolts that secure the headboard. If any are loose, tighten them using an appropriate tool. This will help reinforce the stability and prevent any potential accidents.
- Make necessary adjustments: If the headboard is still not perfectly aligned or stable, consider making minor adjustments. This may include repositioning the attachment points or adding additional support brackets.
By following these simple steps, you can ensure that your standalone headboard stands on its own with stability and style, creating a beautiful focal point in your bedroom.
Maintenance And Care Tips
Keeping your headboard in great condition not only enhances the overall appearance of your bedroom but also ensures its stability and longevity. By following a few simple maintenance and care tips, you can ensure that your headboard stands on its own and remains a stylish focal point in your room.
Here are some key points to consider:
- Cleaning: Regularly dust and clean your headboard to remove dirt, debris, and any stains that may accumulate over time. Use a soft, damp cloth or a gentle upholstery cleaner based on the material of your headboard. Be sure to follow the manufacturer’s cleaning instructions, if provided.
- Maintaining stability: Check for loose or damaged components on your headboard regularly to maintain its stability. This can include inspecting the frame, legs, and any attached hardware. If you notice any loose screws, bolts, or other fasteners, tighten them to ensure the headboard remains sturdy and secure.
- Addressing stability issues: If you encounter any stability issues with your headboard, it’s important to address them promptly. Determine the cause of the instability, whether it’s a structural issue, poor installation, or other factors. Seek professional help if needed, or consider reinforcing the headboard with additional support, such as brackets or wall-mounting options.
- Protective measures: Consider using protective measures to prevent damage to your headboard. For example, using mattress pads or covers can help minimize wear, tear, and stains. Additionally, avoid leaning or placing heavy objects against the headboard, as this can contribute to instability or damage over time.
- Regular inspections: Perform regular inspections to identify any potential issues with your headboard. Look for signs of wear, including frayed fabric or loose upholstery. By addressing these issues early on, you can prevent further damage and ensure the longevity of your headboard.
Taking the time to clean and maintain your headboard, as well as promptly addressing any stability issues that arise, is crucial in ensuring its stability and longevity. By following these simple maintenance and care tips, you can keep your headboard looking great and standing on its own for years to come.
Frequently Asked Questions Of How To Make A Headboard Stand On Its Own
How Can You Make A Headboard Stand On Its Own?
To make a headboard stand on its own, you can attach legs or a base to it. Legs can be made from wood or metal, and should be securely attached. A base can be added for additional stability, and materials like plywood or mdf work well.
Make sure to measure and position the legs or base correctly for a sturdy support.
What Are Some Creative Ideas To Make A Headboard Stand Out?
To make a headboard stand out, you can consider adding unique elements such as a tufted design, using different colors or patterns, incorporating lighting, or using unconventional materials like reclaimed wood or fabric. You can also add a personal touch by including artwork, mirrors, or shelves for added functionality.
Can A Headboard Be Freestanding Without Any Attachments?
Technically, a headboard without attachments can be freestanding, but it may not be stable or secure. Freestanding headboards are prone to tipping or falling over, so it’s recommended to attach legs or a base for added stability. This ensures that the headboard remains in place and minimizes any risks of accidents.
Conclusion
To sum up, making a headboard stand on its own doesn’t have to be a daunting task. With a few simple steps and some creativity, you can create a sturdy and stylish headboard that stands firmly in place. By using the right materials, such as plywood or solid wood, and considering the weight and size of your headboard, you can ensure its stability.
Adding legs or brackets for support, and securing them properly, will give your headboard the strength it needs. Furthermore, by selecting the right design and finish, you can not only make your headboard stand on its own, but also enhance the overall aesthetic of your bedroom.
So, don’t let the absence of a bed frame hold you back from having a beautiful and functional headboard. Follow these tips and enjoy the added elegance and comfort it brings to your space.